Your bottle rocket is complete. Nearly every water rocket design that you can construct will involve some sort of bottle cutting.
How To Make A Water Bottle Rocket Science Project Ideas
I leave a gap so the fins and rocket body form a hollow triangle when viewed from above.

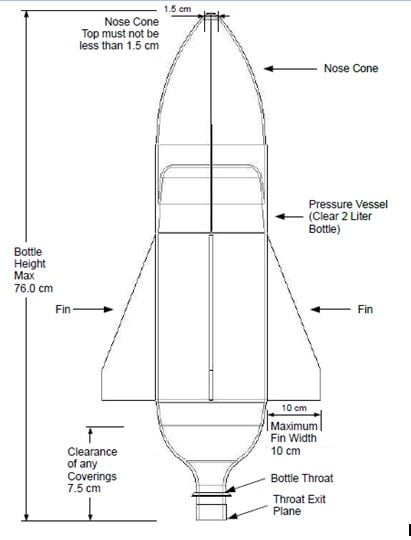
. Use higher pressures. Five Critical Factors A good rocket design can be summarized in five words. Small and simple single bottle rockets may sometimes be.
Reliability rigidness precision weight and drag. Streamline the body of the rocket to reduce drag. Bottle rockets are wonderful projects to get making in order to provide your students to create.
Place in top half of the cut bottle. Attach the cone nose to the bottom of the bottle which is the top of your rocket. Try to not to make one side heavier than the other- your bottle wont go straight up if it is lopsided.
1 Make certain fins are aligned with center axis of rocket. Step 4 Place the un-cut 2 liter bottle pressure vessel into top half. Use an optimum sized nozzle.
Mix the epoxy with a scrap piece of foam core this will be your brush too. Open your adhesive or glue of your choice. Cut a piece of thin cardboard or card stock and tape it into a cone to act as the nose of the bottle rocket.
These bottle connectors are useful for Water Rockets because they allow for a modular approach to be applied to your rocket design which simplifies construction and repair of a damaged rocket. Add the baking soda and quickly push in the cork. How do you make a good bottle rocket.
Some bottles have decorative texturing or compound curves which will make it. Typically water bottle rockets have three or four fins attached at the neck of the bottle. Generally increasing a rocket.
3 Wider fins 14-12 thick provide a larger attachment contact surface. For a one-bottle rocket turn the bottle upside down stick playdoh on the new top and tape fins near the bottom. This compact selection is considered an improvement over its parent forming a dense clump of large serrated dark green leaves and a bouquet of mustard-yellow flowers.
Attach the fins to the lower section of the rocket using glue Velcro tape or other adhesives. Use small piece of tape to secure bottom piece inside bottle. Before starting the mini-activities have students fill out the Initial Design Worksheet so you can gauge their prior concept knowledge about center of mass rocket fin design and selecting the correct propellant for water bottle rockets.
Make sure your ns and nose cone are sealed tight on the bottle. 2 Be sure fins are well affixed to bottle to prevent separation or deflectionmovement during flight. Design Draft 1.
Attach the cone nose to the bottom of the bottle which is the top of your rocket. 1 Make certain fins are aligned with center axis of rocket. They can be securely attached using tape only and are useful for quick assembly.
Use a launch tube on the launcher. In Bottle Rocket participants design and construct two bottle rockets made out of one-liter bottles which each hold a Grade A egg and have to launch it successfully. You can pressurize the bottle by placing the bottle with its top off in a freezer for 2-3 hours.
Heres a quick overview. Attach the cone to the base of the bottle and the fins to the sides. Step By Step Instructions Pass the needle adaptor through the cork in such a way that it goes all the way through.
Cut a piece of thin cardboard or card stock and tape it into a cone to act as the nose of the bottle rocket. Use the right amount of water. Make sure the fins fit your bottle BEFORE putting any glue on them.
I make a middle fold then two folds for tabs for taping the fins to the rocket body. Squeeze out a small amount enough to do one fin. 2 Be sure fins are well affixed to bottle to prevent separation or deflectionmovement during flight.
Sometimes called Elephant Ears this is a bold specimen perennial that needs a moist location. There is no perfect rocket but the following five critical factors will ensure that your design is as successful as possible. You wouldnt want your precious design to fall apart when the rocket is launched with lots of force.
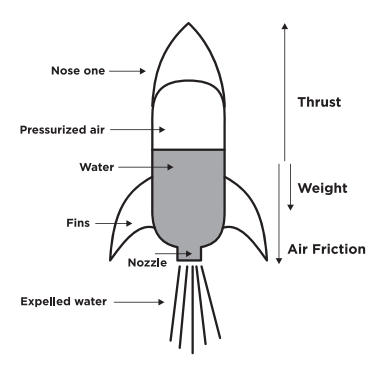
Every rocket has an optimal weight. The types of materials will also be pretty simple to find that makes it an excellent fit for break from soccer practice or fun within the summer time. Use your foam blocks wooden blocks or bricks to create a launch pad for your rocket.
You might have to trim the cork for thisAttach the cone to the base of the bottle and the fins to the sidesMake the bottle a quarter full with water and insert the cork in tightly to close itFor launching take the bottle outdoors and connect the pump to the needle adaptorThe bottle should be made to stand inverted on its finsPump air into the bottle and watch the. Anybody could make bottle rockets since theyre really simple to construct. Make the bottle a quarter full with water and insert the cork in tightly to close.
Keep weight to a minimum. Step 3 Push bottom half of two liter bottle upside down into top half keeps ballast in place. As long as the rockets pressure chamber remains within safe limits increasing the pressure can.
PRE-Mark your bottle with the marker where you want your fins to line up. 3 Launch Information Your bottle rocket when pressurized to 60 psig can be a very dangerous object capable of causing. It is easier to attach fins to a bottle that is slightly pressurized.
Keep weight to a minimum. Dont put any more than the recommended amount of water in any rocket bottle or the rocket may lift off sideways. For fins I cut and fold manila folders.
You can use other material for the ballast such as foam peanuts. You might have to trim the cork. Ok this is the tricky part.

Soda Bottle Water Rocket Rocket Design Water Rocket Water Rocket Designs
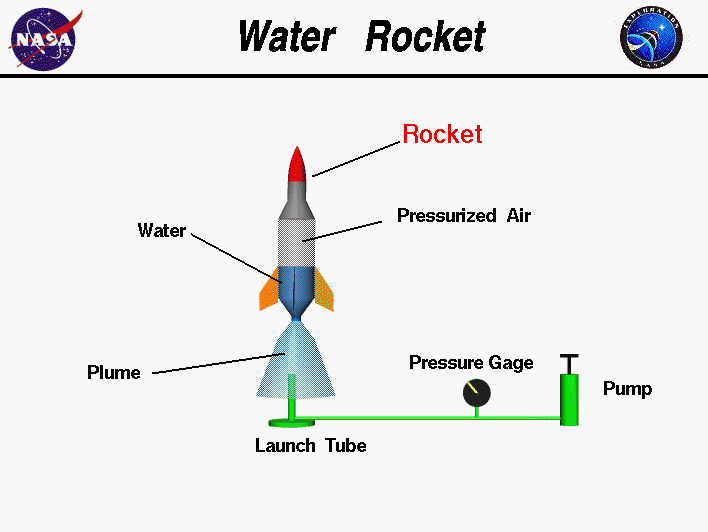
Water Rockets
Design Rocket Variables Water Bottle Rockets
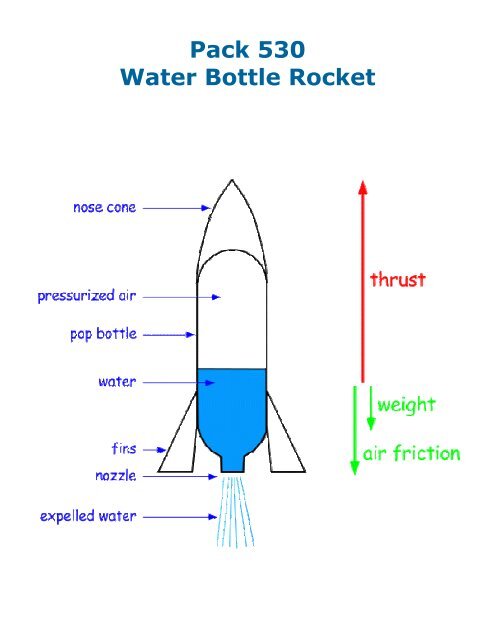
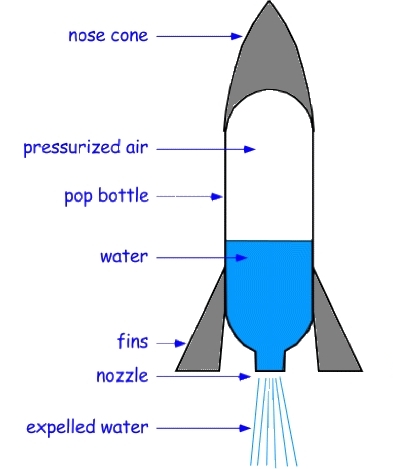
Pack 530 Water Bottle Rocket
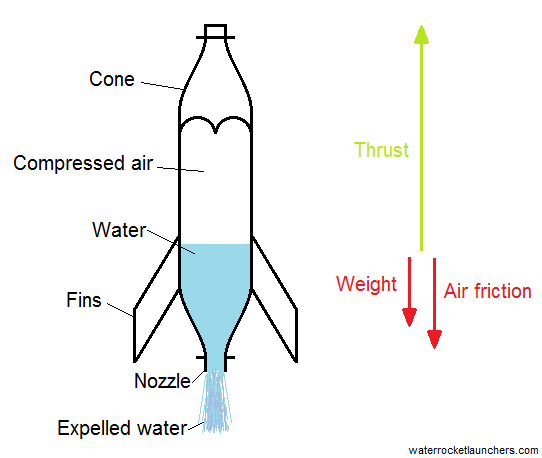
Pop Bottle Rocket Part Iii Force And Mass Science World
2
Professional Water Rocket Guide 20 Steps With Pictures Instructables
How To Make A Water Bottle Rocket Science Project Ideas
0 comments
Post a Comment